Index
Overview
Invoices are primarily generated through the process of a member registering through your Uplifter site. However, administrators can also manually create invoices for any member with a member account. Once created, administrators with the correct permissions can view and edit an invoice.
Invoices display the details that were provided to the member upon registration completion, along with the specific policies that were confirmed at the time of registration. Any additional administrative functions or details are also displayed, such as notes on the invoice and links to edit the invoice for administrators with the correct permissions.
The Invoices page is found by navigating to Accounting > Invoices. In order to access the Invoices page you will need the following permissions: Admin, Edit Invoices, View Invoices.
Webinar
Further Resources
The article below speaks to basic features and functions of the invoice tool within Uplifter. For further information about each button/element on the invoice edit page you may wish to review our article Invoice Anatomy. For more information on more complex processes such as refunds, adjustments, etc. you will want to review our article Invoice Actions.
Invoices
Invoices will capture the purchases, refunds, and adjustments made through your use of Uplifter. The invoice manager, found via Accounting > Invoices will list basic information for your review. Thereafter, you can select to Edit  or View
  an invoice for more information and/or to take actions on the invoice. For more information on specific actions and measures, please see our article Invoice Actions.
Invoice Manager
The invoice manager page is your centralized hub to review all things invoices. Here, you can get a great overview of the invoices that have been processed, and even access those that are in progress. When you first navigate to Accounting > Invoices you'll be greeted by a list of your completed invoices.
There is a lot of at a glance information available on this screen to make your life easier. We've also included a handy legend for your reference.
For any invoice that has not been allowed to expire you can view their status by the sliver of colour on the far left of the invoice segment. Green is completed (note that this may not mean all payments have been received), blue is on hold, and grey is pending (only listed if you filter for this status).
The invoice number, completion date/time, payment interval and medium can all be found on the left side of the segment. The middle will display the member's name to whom the invoice has been issued. On the left of the segment you will find the full cost of the invoice, the current invoice payment status, and any owing balances. You will also find the option to Edit or View the invoice.
Creating an Invoice
Creating an invoice can be accomplished in several ways. You can create an invoice by:
- Hover over Accounting > Invoices and select the
 New Invoice icon
- Navigating to Accounting > Invoices and selecting the New Invoice option along the toolbar
- Navigating to People > Member Accounts, finding your member and selecting the to the right of the member listing
- Navigating to People > Member Accounts, finding your member and selecting their name to enter their profile > Invoices > New Invoice
The first two methods described above will require you to select a member from the Member Select screen.
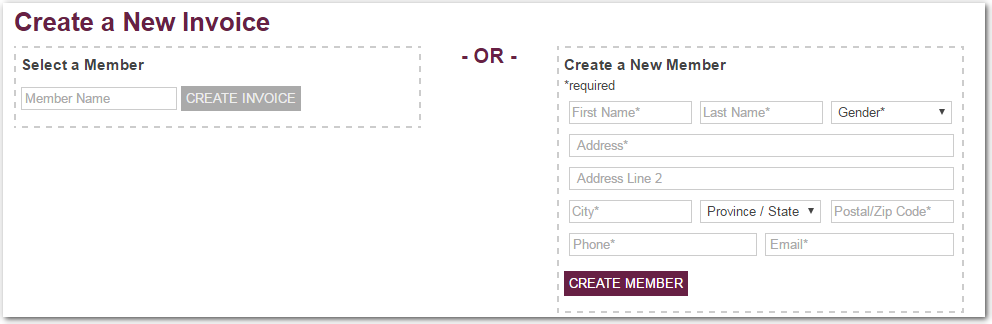
On this screen you can find existing members by beginning to type their name in the Select a Member field on the left and selecting them from the suggested options. Alternatively, you can create a new member by filling out the information on the right, under Create a New Member.
Editing an Invoice
- Select to Edit the desired invoice
Editing an invoice is your way of controlling the items, cost, and payments on an invoice. To begin editing an invoice navigate to Accounting > Invoices and select to Edit the desired invoice. On the invoice edit page you will see the Billing Information section, the Invoice Details section, and the Payments section. On the edit screen various Invoice Actions can be accomplished.
Viewing an Invoice
- Select to View the desired invoice
To view more detailed information for an invoice navigate to Accounting > Invoices and select to View the desired invoice.
Billing Information
The billing information section is the top-most portion of the invoice. It captures your club's/organization's billing information, the member's Billing Information, and the member's Contact Information. These items can all be updated.
Club Billing Information
- Navigate to Settings > Uplifter Settings > Merchant Credentials
- Update the Your Billing Address section
- Select Save All
To update the club billing information that displays on member invoices please navigate to Settings > Uplifter Settings > Merchant Credentials. Here you can use the Your Billing Address form to update the billing information as desired. Once complete, select Save All.
Member Billing Information
- Select to Edit the Billing Information section on an invoice
- Update the information as desired
- Select Accept
To update the member billing information that displays on member invoices please select to Edit the Billing Information section. Here you can use the form to fill in the preferred billing information. Note that this information should match any credit card being used to pay for the invoice.
You can also select from existing (or create new) alternative addresses by using the drop down at the top of the section.
Member Contact Information
- Select to Edit the Contact Information section
- Update the information as desired
- Select Accept
To update the member contact information that displays on member invoices please select to Edit the Contact Information section. Here you can use the form to fill in the preferred contact information.
You can also select from existing (or create new) alternative addresses by using the drop down at the top of the section.
Cancel Invoice
Invoice Details
The Invoice Details section captures a list of all products added to the invoice, segmented into 'line items'. Each line item can be adjusted in various ways, or removed from the invoice. The Invoice Details section can be split into three main parts.
Program Registrations
The program registrations section displays all programs that have been added to the invoice. Within each program line item segment you can withdraw a participant, Edit the line item, Delete  the line item and accept any errors the line item may be causing.
- You can add a new participant to the member's account by selecting Add Participant. Learn more about participants in our article Participants.
- You can add a new program to the invoice by selecting Add Program. Learn more about programs in our article Programs.
- You can add a new subscription, product, or ticket by selecting Add Subscription or Product. This includes custom lines for one-off additions. Learn more about products, tickets, and subscriptions in our article Products, Tickets & Subscriptions.
- You can add a new policy to the invoice by selecting Add Policy. Learn more about policies in our article Policies.
- This is an expanded program line item. An expanded line item show more details and offers the ability to adjust the cost of the item as well as adjust the associated participant and any custom fields. The blue highlighting indicates a newly added program to the invoice.
- The participant drop down. Use this to change the associated participant. Use Add Participant if the desired participant does not exist.
- The program name, category, and category level. The category level is auto-assigned, but you can use the drop down to make changes as desired.
- The price of the program. In expanded view the program's full price will be listed. When viewing a collapsed listing the total price will be noted. If applicable, the full price will be noted and crossed out with the total price below.
- A tax receipt toggle. Enable this to mark this product as tax receipt eligible for tax deductions at year end. This is not synonymous with enabling taxes. Learn more about tax receipts in our article Tax Receipts.
- The add adjustment tab. This lets you introduce an adjustment to augment the price of the program. If you have not yet added an adjustment you can also find the Add Adjustment option in the yellow-highlighted central box. Learn more about adjustments in our article Invoice Actions - Adjust The Cost.
- The action icons including Accept
, Cancel
, and Delete
. Accept
- The participant drop down. Use this to change the associated participant. Use
- This is a collapsed program line item. A collapse line item shows less details and offers quick insights into the program and details. The blue highlighting indicates a newly added program to the invoice.
- A warning or error that has been noted by the system. This may include conflicts with the program's capacity or other requirements/restrictions your organization has introduced like age limits, previous purchases or accomplishments, etc.
- The error acceptance button. Clicking this will tell the system to ignore/override the current error and allow you to proceed. This feature is available on the administrative side only.
- The add to waitlist button. This displays only when the program in question is full and offers a waitlist. Selecting this will place the participant on the waitlist for the program in standard order.
- The action icons including Edit
and Delete
- This is a collapsed program line item. A collapse line item shows less details and offers quick insights into the program and details. The standard white colouration indicates the line item existed on the invoice already. This is seen when editing invoices that have already been posted once before.
- The withdraw button. Clicking this lets you withdraw the participant without affecting any other parameter of the registration. Withdrawing removes the participant from the program roster and frees up a position for any waitlisters/new registrants, so long as the registration period is still active for the program in question.
- The withdraw with adjustments button. Clicking on this will present you with a list of adjustment options. The outcome of these options may vary depending on your program's settings (primarily your proration settings). Select an option and proceed to withdraw your participant from the program and apply the cost adjustments. Learn more about auto-withdrawals in our article Auto-Withdrawals.
- The product history icon. Hover over this (click on mobile) to see the item history including date/time added and adjusted.
Product Purchases
The product purchase section displays all products, tickets, and subscriptions that have been added to the invoice. Within each product line item segment you can Edit the line item or Delete the line item.
- This is an expanded product line item. An expanded line item show more details and offers the ability to adjust the cost of the item as well as adjust the associated participant (if applicable) and any custom fields. The blue highlighting indicates a newly added program to the invoice.
- The participant drop down. Use this to change the associated participant. Use Add Participant if the desired participant does not exist.
- The product name.
- The price of the product. In expanded view the product's full price will be listed. When viewing a collapsed listing the total price will be noted. If applicable, the full price will be noted and crossed out with the total price below.
- A custom field associated with this product. Custom fields can have varying data types. Learn more about custom fields in our article Custom Fields.
- The add adjustment tab. This lets you introduce an adjustment to augment the price of the product. If you have not yet added an adjustment you can also find the Add Adjustment option in the yellow-highlighted central box. Learn more about adjustments in our article Invoice Actions - Adjust The Cost.
- The action icons including Accept
- The participant drop down. Use this to change the associated participant. Use
- This is a collapsed product line item. A collapse line item shows less details and offers quick insights into the product and details.
- The action icons including Edit
- The action icons including Edit
- This is an expanded family/account subscription line item. An expanded line item show more details and offers the ability to adjust the cost of the item as well as any custom fields. The blue highlighting indicates a newly added program to the invoice.
- The noted associated party. This can either be a participant or a family/account.
- The subscription name.
- The price of the subscription. In expanded view the subscription's full price will be listed. When viewing a collapsed listing the total price will be noted. If applicable, the full price will be noted and crossed out with the total price below.
- A tax receipt toggle. Enable this to mark this product as tax receipt eligible for tax deductions at year end. This is not synonymous with enabling taxes. Learn more about tax receipts in our article Tax Receipts.
- The valid until date - visible on subscriptions that have expiry dates. This can be adjusted to reduce/extend the validity of the membership on a singular basis.
- The add adjustment tab. This lets you introduce an adjustment to augment the price of the subscription. If you have not yet added an adjustment you can also find the Add Adjustment option in the yellow-highlighted central box. Learn more about adjustments in our article Invoice Actions - Adjust The Cost.
- The action icons including Accept
- This is an expanded participant subscription line item. An expanded line item show more details and offers the ability to adjust the cost of the item as well as adjust the associated participant and any custom fields. The blue highlighting indicates a newly added program to the invoice.
- The participant drop down. Use this to change the associated participant. Use Add Participant if the desired participant does not exist.
- The participant drop down. Use this to change the associated participant. Use
- This is a collapsed family/account subscription line item. A collapse line item shows less details and offers quick insights into the subscription and details.
- The action icons including Edit
- The action icons including Edit
- This is a collapsed participant subscription line item. A collapse line item shows less details and offers quick insights into the subscription and details.
Calculate, Pending, Hold, Select Payments, and Total
If you have begun making an invoice from scratch, rather than editing an existing invoice, you will find you have a few options at the bottom of your invoice. These options include Calculate, Save As Pending, and Select Payment Method & Post. Please note, these options are only available before you select Post/Post & E-Mail Invoice for the first time.
Calculate
Save As Pending
Hold
Holding an invoice is available when the invoice originated from the public side of your site, or after selecting to Save As Pending. Putting an invoice on hold allows you to retain the invoice (along with all registration information a position reservation) indefinitely. To put an invoice on hold navigate to Accounting > Invoices and filter the page by Pending. Locate your desired invoice and select to Edit . Select Hold Invoice at the top right of the page.
Note that, while an invoice is on hold, some invoice elements may not be editable. To remove the hold status, simply return to the invoice and select Remove Hold.
Select Payment Method & Post
Total
Payments
The Payments section will list all payments on the invoice in the form of payment line items. These items can have several different statuses, including paid, pending, undeposited, and declined. Below the Payments section admins can also add public and private notes.
Payments
The Payments section lists all payments added to the invoice which can be adjusted to fit various contexts. You can edit, delete, and refund these payment lines, depending on their current status.
- You can update all unsettled pending payments to a single payment medium by selecting your preferred medium from the Pay By drop down.
- NOTE: A pending payment created during your editing session is considered unsettled and can be edited in a multitude of ways. Once you have hit Post a pending payment becomes settled and will no longer react to the medium drop down. Note that you can select to Delete a settled pending payment to have the system create a new, unsettled pending payment for your use.
- NOTE: A pending payment created during your editing session is considered unsettled and can be edited in a multitude of ways. Once you have hit Post a pending payment becomes settled and will no longer react to the medium drop down. Note that you can select to Delete
- You can update all unsettled pending payments to installments by Checking Calculate Installments From and setting the preferred date.
- NOTE: A pending payment created during your editing session is considered unsettled and can be edited in a multitude of ways. Once you have hit Post a pending payment becomes settled and will no longer react to the medium drop down. Note that you can select to Delete a settled pending payment to have the system create a new, unsettled pending payment for your use.
- NOTE: A pending payment created during your editing session is considered unsettled and can be edited in a multitude of ways. Once you have hit Post a pending payment becomes settled and will no longer react to the medium drop down. Note that you can select to Delete
- You can refund a paid payment by selecting to Refund
 .
.- NOTE: You cannot refund a value greater than the payment line you are using.
- You can edit a payment to adjust the status, payment time, payment medium, amount, and/or add a note to the payment.
- NOTE: Some payment mediums will restrict status options.
- NOTE: Some payment mediums will require additional information such as Transaction ID or Gift Certificate Code.
- NOTE: By adjusting the amount of a pending payment the system will automatically generate a new pending payment to compensate for the remaining value (if applicable).
Notes & Post
At the bottom of the invoice you will find invoice-specific notes. These notes can either be set to private (only site admins can see the note) or public (site admins and the member can see the note). Just below the notes section you will also find the Post button.
- You can add a new note by selecting the + Add A Note button.
- You can edit a note by selecting Edit . Editing a note lets you:
- Update the note's text.
- Change the note's privacy status.
- Accept or cancel any changes to the note.
- You can delete a note by selecting Delete .
- You can save and post the invoice for the member to review by selecting Post. You can also save and email a copy of the invoice by selecting Post & E-Mail Invoice.
- NOTE: Posting an invoice using the Post from the admin side will not automatically send out a receipt to the member. After posting you will need to select “resend invoice to member” in order to have a receipt emailed if you wish to send them a receipt.
- NOTE: In order to post an invoice the Invoice Details total and the Payments total must match.